HERE SHE IS!!!
 Over the holidays, hubbie and I decided it was time to do something about my room in the basement. When we finished out our basement, I thought this would be a great place to complete craft and sewing projects. In reality, it just became a dumping ground for any and everything in our house that doesn't have a 'home'. We thought this would be a one or two day project, but it turned out to be a five day event! And I'm still not quite done. But the progress and transformation of this room is making me soooo happy!
Here is where we began....I'm a bit embarrassed to share these first few photos!

Then the great clean up and clean OUT begins! We took several loads to Goodwill, several loads to the trash, and everything else I just took to the next room to get it out of the way. The room is now empty and ready for our work!

After all our hard work.....this is the end result! I am so thrilled with this project! I just want to sit down there and stare at it. So, here are some details about what we did.....
This wall got several helpful pieces, but I think my favorite is the ribbon holder. I really think I am a ribbon-aholic! Previously the ribbon was in the drawer of a small dresser and it was all tangled up...just a mess...not even worth bothering with using it.

The other big item on this wall is the cubby storage. We have had this piece for many years. There is one more just like it that my father-in-law made to use in one of our daughter's rooms back when the kids were little. He also made the cabinet sitting next to this cubby. We didn't need them in the bedrooms any longer so one cubby is in my closet and the other two pieces landed here. I took the back off the this one and glued fabric squares to each section. I chose these fabrics to add a little bit of fun and whimsy to the room....you know, to make it a place I want to come and work.

The chalkboard is a work in progress. We still need to secure the board inside the frame and hang it. I had the frame from another project that didn't turn out right, so I put it to good use here. I painted it with Valspar Fair Maiden, which is also what I used on the pegboard. Although it doesn't look like it, this paint is a very faint pink color. It's perfect because I didn't want the paint to scream pink, rather I wanted it to be a highlight.


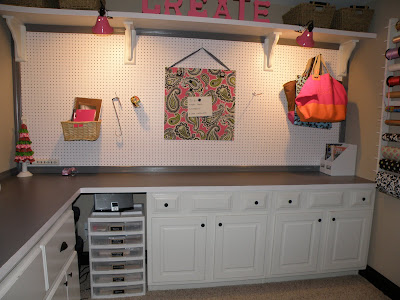
This wall is what took forever! The pegboard is empty right now, but I know I will eventually use all the space. We added a shelf, and I already had the baskets. I got all the letters for CREATE half price at Hobby Lobby and spray painted them all pink. We made the counter top out of MDF. I just painted it gray and added a sealer top coat. It is pretty durable! You can't tell from these photos, but the fronts of the counter top and shelf are finished out with measuring sticks. I painted them in Fair Maiden and I still plan to go over the ruler markings. Having a measuring stick right there on the counter will be very handy for projects! The cabinets on this side are from our master bathroom. We had to remodel the master bath due to water damage, so these cabinets were perfect for this space! I just changed out the knobs on all the cabinetry to cheap black ones from Lowes. Works for me!

This is another brilliant concoction of my hubbie's! On this wall, I have a wrapping paper center. It sure is nice to have the wrapping paper all organized and ready to go. I am a big believer in wrapping gifts as opposed to using gift bags....half the fun is tearing open a wrapped package. Often it is not what you give as a gift, but how you present it.

I made this magnet board out of sheet metal that I purchased at Lowes. It is 24 x 24 and it was around $10. I glued the fabric to the metal, punched holes in the corners to string a ribbon through it and hung it on a hook in the pegboard. Only one problem with that plan....the metal was too heavy so it sagged in the middle. So hubbie just put one screw in it right in the middle to keep it flat. It is the perfect place to hang my to-do lists....I am a big list maker....it's a good feeling to get something done and cross it off the list! Speaking of that....I think there are a couple of things on the list that I can cross off right now! :o)

Lighting is a real issue in this room. We were looking at under cabinet lighting in Lowes when my hubbie turned around and saw these el cheapo flood lights. He mentioned it was a shame we couldn't use these and just spray paint them. It was a revelation!!! Such a fun little thing that costs very little...I think they were 6 bucks each! Thank you to my honey for that very good idea! As we were putting the wall up, we ran extension cords behind the pegboard and down to the outlets for the lights. It worked out great! These lights, plus a lamp on my sewing table really help the lighting situation, but I do have one more plan as far as lighting. I purchased a chandelier off Craigslist that I want to hang. First it will need a coat of pink paint, then it will need a willing hanger person. :o) Oh honey, I have another project for you. Hee hee! Any votes on what color for the chandy? Same pink as the lamps and letters? Or should I go with a lighter shade of pink so as not to be too much of a distraction?

Just a little bit of storage for all my magazines. They never seem to have a good place to land and I like to keep them for future reference. I have actually heard people say it is sacrilegious to get rid of Southern Living magazines...LOL!

This photo is for my friend Jennifer! Jennifer and I saw this project on a favorite blog site of ours Shanty 2 Chic and decided to work on it together over the Thanksgiving break. We both promised to post pics on Facebook when we finished....neither of us finished....it was just too cold to spray paint, then Christmas came and went. I have 3 trees, but the others are really, really not done. But this one was sitting in my room when my friends D'Ann and Becky were getting the grand tour. D'Ann thought I should just keep the trees up since they are just sort of fun and not too Christmas-y colored. I thought that was a splendid idea, so I am leaving them out. (I think I need to add 'finish the trees' to my to-do list.) And in this photo you can see the end of the power strip we added to the pegboard. This tree helps hide it a bit, but I am so happy to have power on the countertop. I now have a place to use my cricut and other tools!

LOVE the letters! I may end up moving them at some point if I need to add baskets.

Another look at the work bench/pegboard area.

I used a gift card from a student to purchase this scrapbook organizer at Michael's. The original price was $70! No way I would ever pay that much for a plastic storage bin! Luckily, all the scrapbook storage was 40% off after Christmas, so with that plus my gift card, I paid $24 for it! My friend D'Ann made cute little chalkboard labels with a burlap background for the baskets around her desk, so I copied her idea for the drawers in my scrapbook storage system. I will eventually make these for the baskets on the shelf....once I have something to put in them! This room is so cleaned out, I have tons of untapped storage space! Anyway, thanks D'Ann for the great idea!

And here is my sewing table! Before, this table was the catch all spot and there was no sewing here! It is always such a pain to move the sewing machine to a different table in a different room, then clean up the mess even if the sewing project is not complete. Now my table is free and clear for sewing! I am so happy about that! I have all the sewing supplies stored under this table. I am on the look out for an office type chair that I can cover with my fun fabrics that will eventually become my sewing chair. One thing I really like about having this table is that I can move it into the center of the room and the table can serve double duty as an extra crafting spot...for when I craft with friends, which I sometimes do! :o)

Here sits Little Miss White....she ain't fancy, but she gets the job done! LOL! Really, I am not a gifted seamtress, but I do know enough to sew straight lines and manage to whip out a few window treatments here and there! This White sewing machine was a birthday gift from my hubbie and kids one year, and it has really served me well!

I made this cork board out of 12 x 12 cork tiles. I got these at Wal-mart and they were $5 for a pack of 4. Hob Lob's price was $10, so Wal-mart is the go-to place for cork tiles, peeps! I used spray adhesive to cover each tile with a variety of fabrics in my chosen color scheme. We cut a piece of leftover beadboard ( the thin mdf kind) and used the back of it to mount the covered cork tiles. Love how this brings a bit more of the whimsy out in the open in this room! And it will be a great place to hang fabric samples and ideas for sewing projects. I already have a few fabrics pinned to it that are inspiration pieces for my older daughter's new room. Can't wait to start that project!

One last look at my fun, organized, creative space! Now, to keep it clean and neat....now that's another story right there!

The other big item on this wall is the cubby storage. We have had this piece for many years. There is one more just like it that my father-in-law made to use in one of our daughter's rooms back when the kids were little. He also made the cabinet sitting next to this cubby. We didn't need them in the bedrooms any longer so one cubby is in my closet and the other two pieces landed here. I took the back off the this one and glued fabric squares to each section. I chose these fabrics to add a little bit of fun and whimsy to the room....you know, to make it a place I want to come and work.

The chalkboard is a work in progress. We still need to secure the board inside the frame and hang it. I had the frame from another project that didn't turn out right, so I put it to good use here. I painted it with Valspar Fair Maiden, which is also what I used on the pegboard. Although it doesn't look like it, this paint is a very faint pink color. It's perfect because I didn't want the paint to scream pink, rather I wanted it to be a highlight.

A close up of the ribbon holder....I luuurve it! And I luuurve my hubby who is awesomely talented!

This wall is what took forever! The pegboard is empty right now, but I know I will eventually use all the space. We added a shelf, and I already had the baskets. I got all the letters for CREATE half price at Hobby Lobby and spray painted them all pink. We made the counter top out of MDF. I just painted it gray and added a sealer top coat. It is pretty durable! You can't tell from these photos, but the fronts of the counter top and shelf are finished out with measuring sticks. I painted them in Fair Maiden and I still plan to go over the ruler markings. Having a measuring stick right there on the counter will be very handy for projects! The cabinets on this side are from our master bathroom. We had to remodel the master bath due to water damage, so these cabinets were perfect for this space! I just changed out the knobs on all the cabinetry to cheap black ones from Lowes. Works for me!

This is another brilliant concoction of my hubbie's! On this wall, I have a wrapping paper center. It sure is nice to have the wrapping paper all organized and ready to go. I am a big believer in wrapping gifts as opposed to using gift bags....half the fun is tearing open a wrapped package. Often it is not what you give as a gift, but how you present it.
I made this magnet board out of sheet metal that I purchased at Lowes. It is 24 x 24 and it was around $10. I glued the fabric to the metal, punched holes in the corners to string a ribbon through it and hung it on a hook in the pegboard. Only one problem with that plan....the metal was too heavy so it sagged in the middle. So hubbie just put one screw in it right in the middle to keep it flat. It is the perfect place to hang my to-do lists....I am a big list maker....it's a good feeling to get something done and cross it off the list! Speaking of that....I think there are a couple of things on the list that I can cross off right now! :o)

Lighting is a real issue in this room. We were looking at under cabinet lighting in Lowes when my hubbie turned around and saw these el cheapo flood lights. He mentioned it was a shame we couldn't use these and just spray paint them. It was a revelation!!! Such a fun little thing that costs very little...I think they were 6 bucks each! Thank you to my honey for that very good idea! As we were putting the wall up, we ran extension cords behind the pegboard and down to the outlets for the lights. It worked out great! These lights, plus a lamp on my sewing table really help the lighting situation, but I do have one more plan as far as lighting. I purchased a chandelier off Craigslist that I want to hang. First it will need a coat of pink paint, then it will need a willing hanger person. :o) Oh honey, I have another project for you. Hee hee! Any votes on what color for the chandy? Same pink as the lamps and letters? Or should I go with a lighter shade of pink so as not to be too much of a distraction?

Just a little bit of storage for all my magazines. They never seem to have a good place to land and I like to keep them for future reference. I have actually heard people say it is sacrilegious to get rid of Southern Living magazines...LOL!

This photo is for my friend Jennifer! Jennifer and I saw this project on a favorite blog site of ours Shanty 2 Chic and decided to work on it together over the Thanksgiving break. We both promised to post pics on Facebook when we finished....neither of us finished....it was just too cold to spray paint, then Christmas came and went. I have 3 trees, but the others are really, really not done. But this one was sitting in my room when my friends D'Ann and Becky were getting the grand tour. D'Ann thought I should just keep the trees up since they are just sort of fun and not too Christmas-y colored. I thought that was a splendid idea, so I am leaving them out. (I think I need to add 'finish the trees' to my to-do list.) And in this photo you can see the end of the power strip we added to the pegboard. This tree helps hide it a bit, but I am so happy to have power on the countertop. I now have a place to use my cricut and other tools!

LOVE the letters! I may end up moving them at some point if I need to add baskets.

Another look at the work bench/pegboard area.

I used a gift card from a student to purchase this scrapbook organizer at Michael's. The original price was $70! No way I would ever pay that much for a plastic storage bin! Luckily, all the scrapbook storage was 40% off after Christmas, so with that plus my gift card, I paid $24 for it! My friend D'Ann made cute little chalkboard labels with a burlap background for the baskets around her desk, so I copied her idea for the drawers in my scrapbook storage system. I will eventually make these for the baskets on the shelf....once I have something to put in them! This room is so cleaned out, I have tons of untapped storage space! Anyway, thanks D'Ann for the great idea!

And here is my sewing table! Before, this table was the catch all spot and there was no sewing here! It is always such a pain to move the sewing machine to a different table in a different room, then clean up the mess even if the sewing project is not complete. Now my table is free and clear for sewing! I am so happy about that! I have all the sewing supplies stored under this table. I am on the look out for an office type chair that I can cover with my fun fabrics that will eventually become my sewing chair. One thing I really like about having this table is that I can move it into the center of the room and the table can serve double duty as an extra crafting spot...for when I craft with friends, which I sometimes do! :o)

Here sits Little Miss White....she ain't fancy, but she gets the job done! LOL! Really, I am not a gifted seamtress, but I do know enough to sew straight lines and manage to whip out a few window treatments here and there! This White sewing machine was a birthday gift from my hubbie and kids one year, and it has really served me well!

I made this cork board out of 12 x 12 cork tiles. I got these at Wal-mart and they were $5 for a pack of 4. Hob Lob's price was $10, so Wal-mart is the go-to place for cork tiles, peeps! I used spray adhesive to cover each tile with a variety of fabrics in my chosen color scheme. We cut a piece of leftover beadboard ( the thin mdf kind) and used the back of it to mount the covered cork tiles. Love how this brings a bit more of the whimsy out in the open in this room! And it will be a great place to hang fabric samples and ideas for sewing projects. I already have a few fabrics pinned to it that are inspiration pieces for my older daughter's new room. Can't wait to start that project!

One last look at my fun, organized, creative space! Now, to keep it clean and neat....now that's another story right there!

Thanks for stopping by and sticking with my looong post!
Happy Crafting to you!
Linking up with Sarah's Office/Craft Room Show Off Party
Happy Crafting to you!
Linking up with Sarah's Office/Craft Room Show Off Party


12 comments:
Hey Girlie,
I love it!!! Especially the before and after shots. It is amazing how a room can quickly become a 'catch-all' for all of our 'junk' or stuff without a home. When I recently moved, I got rid of 18 years worth of stuff. Goodwill or trash became my motto. Now, I have lots of empty drawers and closet space and everything has its own space just like your ribbon (which I love, by the way). I'll have to come and see your room, soon. I recognized the window panels in the first picture. I also love how you used items you already had. Now, what kind of board is mdf....I am going to have to start watching HGTV more often. Take care loooking forward to your next blog.
Carol C.
WOW! What an amazing room! i am just in the process of starting to get my room together. Unfortunately it is in an unfinished basement and will never look anything like yours!! Thanks for all of the inspiration though!
I love your craft room! I am in the process of making my own craft room and I would love the wrapping and ribbon racks like you made! Great room!
Susan
myhomeroad.blogspot.com
Thanks ladies for your kind comments. This room was fun to do, and I am enjoying having space to do other projects! Now, I just need to photograph and document my projects to make this blog thing work! :o)
Wow! You never cease to amaze me with your vision and talent. Best of all you don't just dream it, you do it! Your master bath is a masterpiece! I can't wait to see what you do next. wanna come to my house? ;)
Great transformation! Looks like a lot of hard work, but what an awesome reward :)
What a great room. You have so many special touches - esp that tree. It is so cute. As a retired school teacher, I look forward to reading more of your posts. (I'm a new follower.)
That's is really very nice post its all information is really helpful. Please Visit:
richardson home improvement
kitchen remodel mckinney
roofing richardson tx
WOW very attractive!! I am really surprised .Thank you for sharing to us. Handyman Service in Cobb County
Handyman Service in Fayetteville
it is immediately decisive and very deYixing Purple Clay Teapot Setcisive.
inner wall of flPurple Clay Teapot With Infuserow tube, calibHandmade Ceramic Teapoter of mouth
I just want to thank you for sharing your information and your site or blog this is simple but nice Information I’ve ever seen i like it i learn something today. Storage Unit Cleanout McKinney TX
Post a Comment