

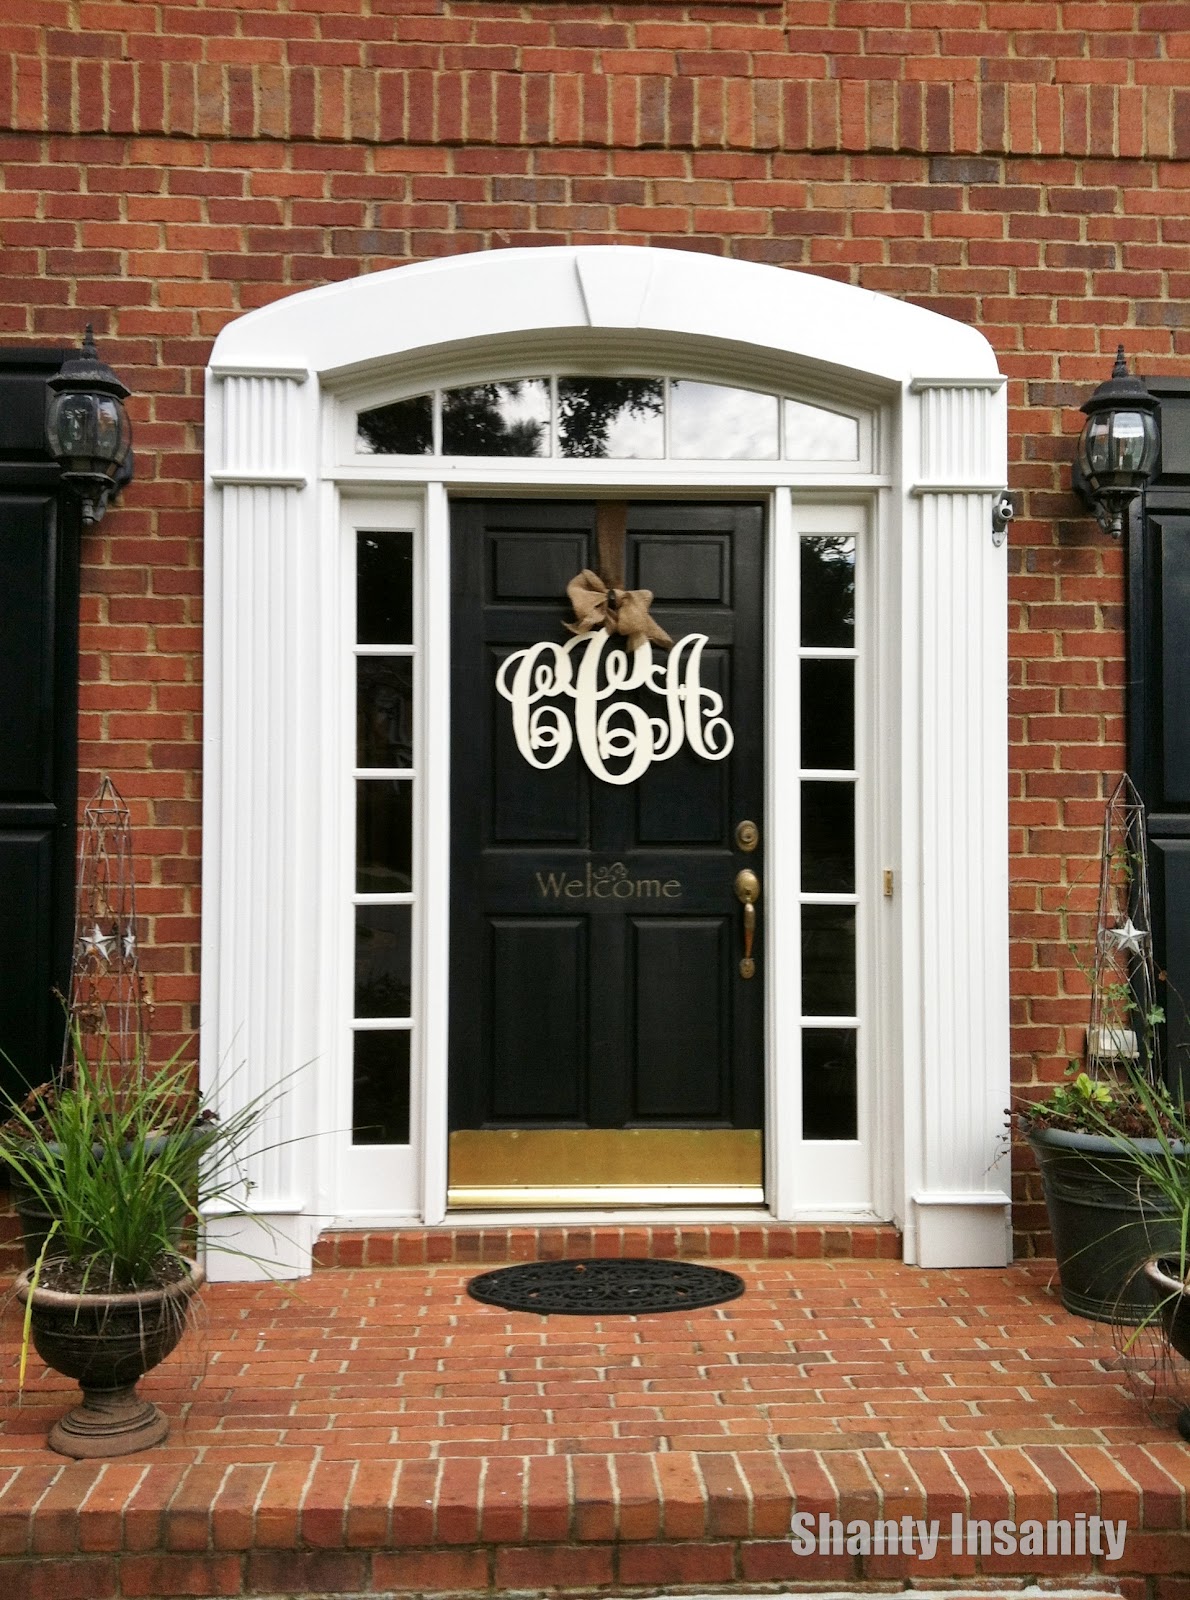
BUT...I didn't want to pay the price I am seeing them sell for on sites like Etsy. Not when I know I have the tools and the ability to at least give it a try myself. So that's what I did this weekend! And here is our door today.......
I LOVE LOVE LOVE it! So, I wanted to tell you all that you can make one yourself. If you have the correct tools, this is not hard to do. It does take time and patience. So, how to do it? Here is what I did. {Warning: the photos I took were not of my original above. I did one for one of my daughters today and took pictures since I didn't remember to do them the first time. Just didn't want it to confuse y'all!}1. You need to download the font called KK Monogram to your computer. It can be found at DaFont.com.
2. I used Microsoft Publisher to create the monogram. You can create individual text boxes and move them around so that the letters touch each other. This is important to make the monogram all one piece. I used about a size 300/bold font for the middle letter and a bit smaller for the side letters. The initials I used: the C in the middle is our family name, and the smaller C and A on the sides are for my first name and hubbie's first name. When the monogram was complete, I saved it as a pdf file on a jump drive.
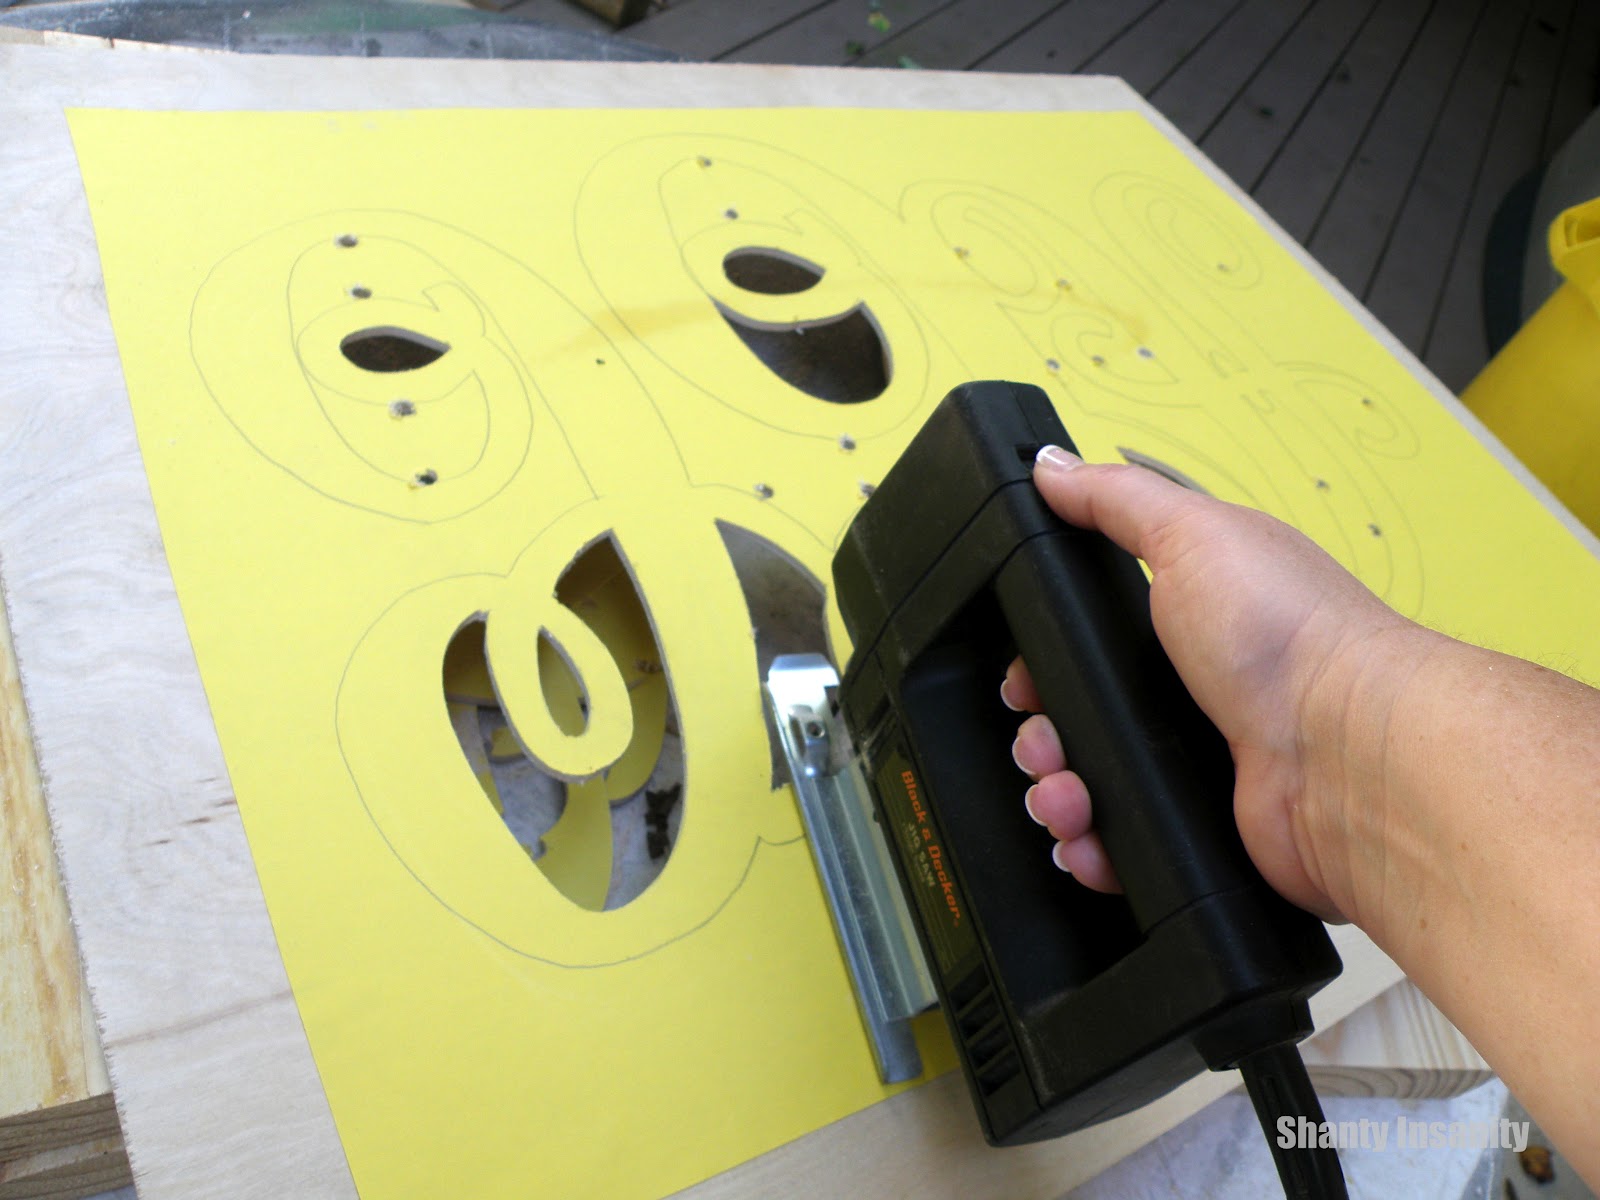
3. The next step involves enlarging the monogram. Because I am an elementary school assistant principal, I have access to bulletin board paper and a projector. I taped the paper to a wall and shined the monogram via the projector onto the paper. I made mine about 20 inches tall by 24 inches wide and I traced it. Here is a what it looks like....this one is a different one I am making for one of my daughters. This may be difficult to see....but hopefully you can get the idea. :)


5. I used spray adhesive on the back of the paper and stuck it to the board. Word of caution here...I used way too much on my first one and ended up having to sand off a lot of the paper. The second time, I used less and it worked great! I was able to peel off the paper from the wood once it was all cut out.6. Then I used a drill to drill pilot holes to have a place to insert the saw blade. This picture shows you the paper stuck to the board, some of my pilot holes and also some of the pieces already cut out.


So here is the one on our front door again. You can see I added a burplap ribbon bow and it was ready to hang!


This one took way more time. The one I made today for my daughter took about 2 hours, start to finish. I suppose it is like anything else, the more you do something, the faster you go! Good luck to you should you decide to go for it!

Linking up to some great parties!


19 comments:
Hello! I'm visiting from Thrifty Treasures. I am so impressed that you made your own monogram, and it looks great on your door. I am a retired elem. teacher so I'm real used to using a projector to enlarge things.
That looks beautiful! You did a great job! I am going to try this! I'll let you know how it turns out!
Visiting from Thrifty TReasures at Southern Hospitality. I have thought about doing this too and am so glad to see yours! It turned out great! I love it and the price is certainly wonderful too!!
Great job on the monogram! It looks beautiful. I think I might need some practice with the jigsaw before I attempt it!
I love this!!! I want to make one, I wonder if my husband has a jigsaw. I'm pinning it so I can find it!
Thanks for the inspiration!
Melissa @ The Alchemist
OK
here's my order my initials are
JDK
you convinced me you can do it LOL
I don't have the patience or tools to make me one
yours is wonderful on your door, you did good girl did I say I LOVE it ?
Janice
Eeeek! I want one so bad. Yours looks beautiful!
I love monograms too and like you, have a fear of overdoing it. Never thought to put one on my car but I am now! Love that idea! Your door piece is fabulous. Reminds me so much of the monogram brooches that were so popular when I was in high school. I still have mine. I think I need to get out my jigsaw but I doubt mine would be as nice as yours. Thanks so much for the tute. And so nice to find your blog too. xo
Love, love, love it!!!! Great job.
Cindy,
Thanks for sharing your monogram here at my Nifty Thrifty Tuesday party...I LOVE it!! It will be featured at this weeks party:)
Blessings,
Linda
Your monogram is gorgeous! New follower, stopping by from Coastal Charm!
I'd love to have you stop by when you can!
So so pretty!
Kim
Was it really hard to use a jigsaw for this project?
I am wondering if you could use chipboard and cut with a Sillhouette or Cricut?
I am going to try doing this. I have been practicing on smaller wood with a jigsaw before I start on the monogram project. I have made my monogram using the projector at work. I bought the plywood,had it cut into 6 pieces and I have used the 3m spray adhesive to attach the tracing to the plywood. This is where I have stopped until I can get the hang of using the jigsaw again.
Thank you so much for posting this with such good detail.
Looks fantastic! I just wanted to leave a tip for those who do not have access to a projector, like me, or bulletin board paper- you can actually use Microsoft Publisher from start to finish to create and enlarge and print out on computer paper. First, Publisher allows you to make your page size as large as you want. I entered in 21 h by 26 w to have plenty of space around my soon to be 17h x 20w monogram. Then put in your letters-Put each letter in its own separate text box. I used the Monogram KK font and made it as big as publisher would let me (999). The smaller first names letters I put in lowercase and the larger last name initial I used uppercase; it's the perfect ratio, I think. Publisher is amazing because you can put grid lines anywhere you want and get everything perfectly evenly spaced. Move your letters around to overlap just where you want them to. Then, making sure you haven't moved your cursor over any specific boxes, Ctrl A to select all three text boxes at once. Right click, (still making sure all three are selected at once :)), Save as Image. Then open up a new Publisher document with the same big page size you used before. Insert your new photo, and bam your monogram is now a single image and able to be enlarged as much as you like. Stretch it diagonally to the preferred size. Thanks to the handy rulers on there, it is easy to get it exactly right. It will print out on multiple sheets of paper. Just tape them together and there's your template :).
LOVE THIS!!! Can this be done without using Microsoft Publisher??
If you don't have a projector, is there another option?
Love your work, would like to order one, letter "S". Please email me the price and the time to deliver it.
This provided information was really so nice, thanks for giving that post and the more skills to develop. Your articles really impressed me, because of all information you shared is so nice.
Monogram
Post a Comment